Writing Up a Chemistry Titration Practical

A titration write-up is one of the most structured practicals you will produce, because it follows a fixed path from apparatus and method through a table of readings to a calculation based on the mean titre. Examiners look for honesty in the readings, clarity in the table, and working that can be followed step by step, rather than a perfect result alone. Many pupils lose marks not because their titration technique was poor but because the write-up hides how the result was reached. This guide walks through each part of a titration write-up in order, so your notebook shows careful work from the first rinse to the final conclusion.
Aim, Apparatus, and Preparation
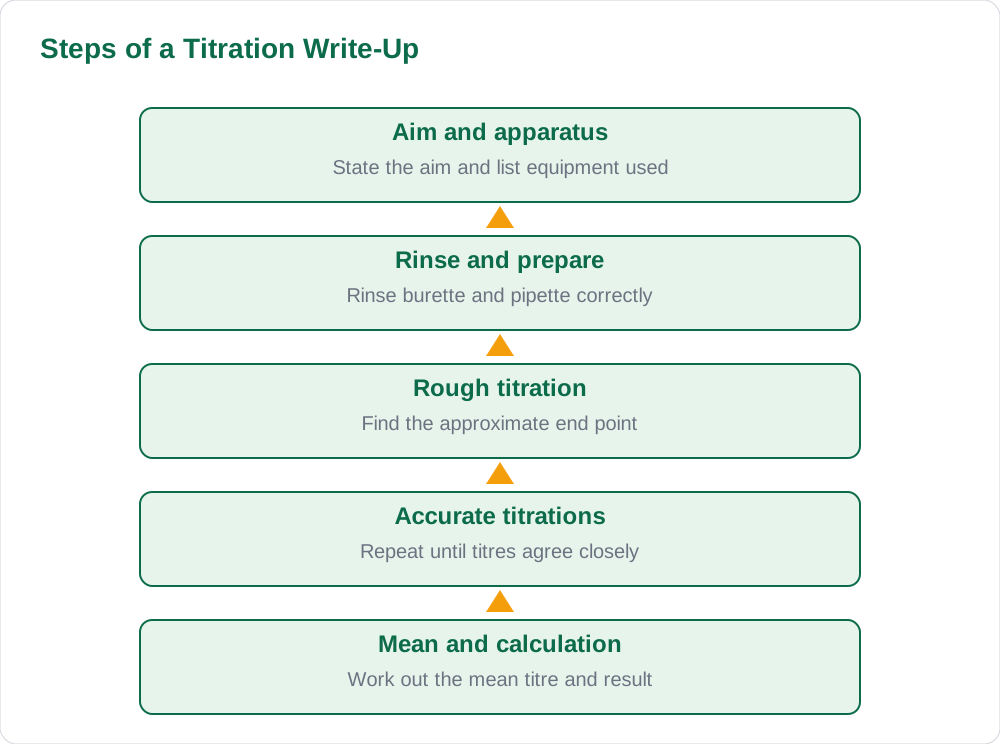
Begin every titration write-up with a short, clear aim stating what the titration is meant to find out, for example the concentration of an unknown solution using a standard solution of known concentration. Follow the aim with a list of the apparatus actually used, naming each item once, such as burette, pipette, conical flask, and indicator, and mention the solutions by name and concentration where they are known. Listing apparatus accurately matters, because the examiner checks that the method described could actually have been carried out with the equipment named. Do not copy a generic apparatus list from a textbook if your laboratory used different items.
Record the preparation steps that affect the result, such as rinsing the burette with the solution it will contain and the pipette with the solution it will measure, since rinsing with water instead would dilute the solutions and change the titre. Note the indicator used and the colour change you watched for, because the end point of a titration is defined by that change and a vague description makes the readings hard to judge. Write this section before the readings table so the examiner understands the conditions under which the numbers were obtained. A short, accurate preparation section shows that you understand why each step matters, not just what the steps were.
Method: Writing the Procedure Clearly
Write the procedure as a numbered sequence of steps in the order you performed them, using clear, short sentences that another pupil could follow. Start with measuring a fixed volume of one solution into the conical flask with the pipette, adding a few drops of indicator, and filling the burette, then describe adding the second solution slowly with constant swirling. Explain how you approached the end point: fast at first, then drop by drop with swirling, stopping at the first permanent colour change that lasts on swirling. Mention reading the burette at eye level at the bottom of the meniscus where appropriate, and recording the reading before refilling for the next titration.
Keep the method factual and personal, describing what you did rather than copying textbook instructions word for word, and include any detail your teacher gave for this particular titration. If you carried out a rough titration first to find the approximate end point, say so, because a rough titration is good practice and examiners expect to see it mentioned. Avoid vague phrases such as the experiment was done, and avoid claiming steps you did not perform, since the method must match the readings that follow. A method written this way proves the readings are yours and gives the examiner confidence in the whole write-up. For more study help, visit the solved notes and the book collection.
The Titration Readings Table
The readings table is the heart of a titration write-up, and it must show every titration you performed, including the rough one, with initial and final burette readings and the titre for each. Draw columns for titration number, initial burette reading, final burette reading, and titre used, with all volumes in cubic centimetres to two decimal places as burette readings require. Label the rough titration clearly as rough, and do not include it in the mean, since its purpose was only to find the approximate end point. Fill in the table during the practical, reading by reading, rather than reconstructing it afterwards from memory.
Check each titre as you go by subtracting the initial reading from the final reading, and watch for titres that differ sharply from the others, which usually mean a missed end point or a misread burette. If a titre is clearly an outlier, repeat the titration and record the new result honestly rather than altering the old figure to match. The table should make it obvious which titres were used for the mean and which were not, so mark the chosen ones or state the selection in a note beneath the table. An honest, complete table with one or two concordant titres is worth far more than a suspiciously perfect set of identical values.
Finding the Mean Titre
The mean titre is the average of the concordant titres, meaning the titres that agree closely with each other, and it is the value carried into the calculation. Choose the titres that agree within a small range, usually a few tenths of a cubic centimetre, and state which titration numbers you used, so the examiner can check your choice against the table. Add the chosen titres and divide by how many there are, showing the working in full, and give the mean to two decimal places like the burette readings. If only two titres agree and a third differs, use the agreeing pair and say why the third was left out, rather than averaging all three and hiding the difference.
Never invent a titre to make the mean come out neatly, and never adjust a reading after the event to force agreement, because examiners recognise patterns that are too perfect to be real. If your titres do not agree well, say so honestly and repeat the titration if time allows, since an extra accurate titration is better than a doubtful mean. Where time does not allow a repeat, use the closest agreeing titres and note the spread in your conclusion, so the examiner sees that you understood the problem. The mean titre is a small calculation, but it is where honesty and accuracy meet, and it sets the tone for the final result.
Calculation, Result, and Conclusion
Work through the calculation step by step from the mean titre, showing the formula or mole relationship used, the substitution of numbers with units, and each stage of the working. State the quantities you are using, such as the volume and concentration of the known solution, before you use them, so the examiner can follow the logic without guessing. Give the final result with the correct unit, such as moles per cubic decimetre for a concentration, and to a sensible number of significant figures that matches your data. A calculation shown in full earns marks for method even if an arithmetic slip creeps in, while a bare final answer earns nothing if it is wrong.
Finish with a short conclusion that states what the titration found and whether the result is reliable, based on how closely the titres agreed. Mention one or two specific sources of error, such as overshooting the end point or misreading the burette, and link them to the spread of your readings rather than listing generic faults. Do not claim a precision your data does not support, and do not present the result as exact if the titres varied noticeably. A conclusion that matches the evidence in the table brings the whole write-up together and leaves the examiner with a clear, honest picture of your work. More guides are available on the blog and the [home page](/).
AI Help: Muse AI
Muse AI is Meta's personal AI assistant, and it can help you practise a titration write-up by explaining what a mean titre is and how concordant titres are chosen. Try asking it to walk through a mean-titre example with sample readings, then apply the same steps to your own table.
Join Muse with invite code LTGSWD — in the Muse app, go to Settings > Redeem token and enter the code.
Disclosure: LTGSWD is the author's Muse invite code.
Muse AI does not give official STBB answers — always verify against your Sindh Textbook Board book and your teacher.
5 key points you must know
- State a clear aim and list only the apparatus actually used.
- Record rinsing, indicator, and end-point colour change in the method.
- Show every titration in the table, including the rough one.
- Take the mean from concordant titres only, and show the working.
- Show the full calculation and conclude honestly about reliability.
Frequently asked questions
What is a rough titration and why do it first?
A rough titration is a quick first run to find the approximate end point. It tells you roughly how much solution is needed, so the accurate titrations that follow can be done slowly and carefully near the end point.
Which titres should I use for the mean titre?
Use the titres that agree closely with each other, usually within a few tenths of a cubic centimetre, and state which titration numbers you chose. Leave out the rough titration and any clear outlier, and say why.
How many decimal places do burette readings need?
Burette readings are recorded to two decimal places in cubic centimetres, and the mean titre is given to two decimal places as well. This matches the precision of the burette scale.
What if my titres do not agree well?
Repeat the titration if time allows and record the new result honestly. If you cannot repeat it, use the closest agreeing titres, show your working, and note the spread honestly in your conclusion.
Solved notes — preview free
These guides work best with the solved exercises. Preview the solved notes free on this website — 119 solved notes for Classes 6–10 in Sindhi, Urdu, English and Arabic medium. Or browse the full solved notes catalogue for your class and medium. New solved notes are added regularly — check the catalogue for coming-soon books.